Installation
To install PVKII you will need 3 things.
- First: A copy of Steam
- Second: You need to have at least one legitimate Source game installed. Click Here for a full list.
- Third: You need to download a copy of the Source SDK Base which can be found in the 'Tools' tab of steam and requires a Source game to download
Finding a server
You will now need to find a server to play on. Run Pirates, Vikings and Knights II by opening the game through your 'Games' tab in Steam. Click on "Find Server" from the main menu. A menu listing all PVKII servers that have bypassed your filters will pop up. Find a server with the lowest ping that has people playing and click "Join Game".
  |
MOTD Upon
joining a server, you will see the Message Of The Day screen. Read this
carefully, many server operators use the MOTD to explain their rules. Teams After
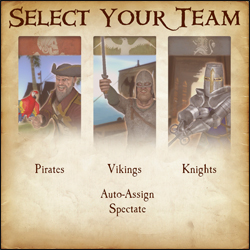
the MOTD screen, you will have the opportunity to select a team.
Choose to be a Pirate, Viking, or Knight. You can look at the scoreboard ('Tab' by Default) to see which team has the least number of players. You may also choose Auto-Assign if you can't decide which team to join.
Classes
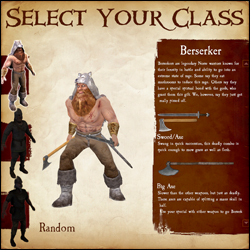
After selecting a team, you will have your choice of which class to play. As you hover over each class, a list of that class's weapons and general descriptions of each will show on the right. If you still can't decide which class to play, select random.
Kill stuff That's
its! If all has gone well, you have now spawned and are ready to do
some serious fragging. Go look for some enemies and stick a sword in 'em.
For more in-depth information on objectives, see Section 4. Game
Modes. For more information about sticking swords in people, see
Section 3. Combat. |
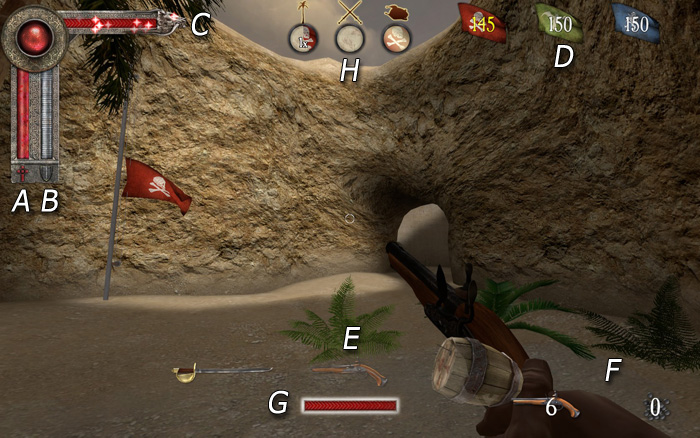
a) Health bar
b) Armor bar
c) Special attack bar
d) Round Counter
e) Weapon select
f) Ammo
G) Power Meter
H) Territory Icons
- Melee - Hold your attack button (Default Mouse1) to charge your attack, release the button to swing. Attacking with a melee weapon can be done in one of four directions. Choosing a direction to swing corresponds to your movement when first charging the attack. Moving left swings Right -> Left, moving right swings Left -> Right, forward is an Overhead chop and moving backwards is a stab. A prepared attack can be cancelled by pressing the block key (mouse2).
Hit detection now takes into account the weapon's arc. With a big enough arc (most two-handed weapons) it is possible to hit multiple opponents who are close enough together.
Hitting an opponent with a 100% charged attack will break their block and deal damage; this also has a chance of stunning them.
Try to keep your melee weapons focused on enemies, throughout the duration of your swing, to inflict maximum damage.
When two players strike each other with fully charged attacks at the same time, they will both be stunned. - Ranged - When using the throwing axes, javelins or longbow, you need to charge the weapon fully for maximum damage and distance. The javelin's charge increases by running forward. When aiming at distant targets, keep in mind the arc of the projectile and the time it will take to get there. This is especially important if your opponent is moving.
A prepared attack can be cancelled by pressing the block key (mouse2).
Projectiles fired at close range targets will do significantly less damage than if fired from further distances.
Pistols are more accurate when standing still, and the blunderbuss has a limited range due to shot spread; the closer the opponent is, the more damage it will do. - Special Attacks - Keep an eye on your special meter; it will slowly fill as you do damage to your oponents. When the meter is full, use your special by hitting your special button (Default Mouse3). Not all weapons have a special, check Section 5. Classes for more info.
b) Blocking
- Parrying - You can parry with any melee weapon (Default Mouse2) in one of four directions. The direction you block will be automatically chosen for you; this will depend on the attack direction of your closest enemy.
A successful perfect parry will mitigate all damage and stun your opponent, as well as allow you to perform a quick counter attack.
If you block to the wrong direction of your enemy's attack you will take partial damage and there is a chance you will be stunned.
Enemy weapons and shields that are glowing are fully charged and have the potential to break your block. - Shield Blocks - Shields can be used to block (Default Mouse2) both ranged and melee. While blocking, the player may hit their attack button to bash the enemy with their shield. You may also charge your shield bash as you would a normal attack. A fully charged shield bash will knock a chest from your enemy's hands. The greater the charge of your shield bash - the further enemies will be pushed back.
Shields have health points that differ for each shield. A shield that loses all of its health will break and become unusable; you can repair your shield by picking up armor.
An enemy blocking with their shield will take partial damage from a fully charged melee attack. - Counter Attacking - After a 'Perfect Parry' the player can hit their attack button to do a quick counter attack. The opponent will be stunned and unable to block.
- Weapon Sizes - The size of your weapon vs. your opponents weapon will decide how well you can parry.
Small weapons cannot 'Perfect Parry' large ones, but will reduce the damage taken when performing a successful parry.
| Last Team Standing (LTS)
The simplest game mode of them all - Kill everyone
you see who is not on your team. The last team with living players wins the round. Win the most rounds to claim overall victory! Booty (BT)
The objective of booty mode is to infiltrate the enemy bases and
bring back as many chests as you can to your own base. Every chest at
your base will lower the counter. The first team to reach zero on this
counter wins the round. On some maps, a particular team may start with
all of the chests with the objective of defending them from the other
teams who have no chests. To compensate for the advantage, the team
will have a much higher counter. In other maps there may be chests in areas of the map outside of team zones. The effective team must strike a balance
between offense and defense, for if everyone is on offense, an enemy
may steal chests from the base while no one is there. Should everyone
be concentrated on defense, there is no possibility of obtaining more
chests. Capturing a chest that was previously owned by another team will remove 5 tickets from your counter and add 5 to theirs. First team to hit 0 tickets wins. Standing in an enemy's chest zone will stall their tickets from decreasing. Use your special while carrying a chest to gain a speed boost for a few seconds. Territory (TE)
Territory is exactly as the name says. The objective is to capture and hold the territories throughout the map. Once a territory is captured, it will count down that team's tickets. The more territories your team holds, the faster your counter goes down. In some maps, holding all of the territories at once will initiate a final countdown; if your team holds all of the territories for the duration of that countdown, you win automatically. Otherwise, the first team to reach 0 wins the game. Standing in an enemy territory, even when outnumbered, will slow the rate that their tickets will decline. Standing in a territory you control will prevent an equal or lesser number of enemies from neutralizing it. It's impossible to capture a neutral territory without first clearing out all the enemies inside. Objective Push
This is an interesting game mode as it will change depending on the map. Mappers have free reign to make anything an objective as long as it has an input/output ability. The designated team that defends must hold out until the timer hits zero, the designated attackers must complete the objectives before the timer reaches zero. If you're a mapper, check here for a quick guide.
Trinket Wars (TW)
In Trinket Wars, each team gets its own ancient relic to protect. The objective is to score kills on enemy players whilst holding your teams trinket or being near your team's trinket carrier. Once you've collectively scored enough points to satisfy the level's ticket requirement, you win! Teamwork is very heavily emphasized in this mode. Only losers fly solo!
|
Archw Bondage Hot! < Must Watch >
The conclusion of a session requires immediate physical reassessment. Check for rope burns, provide hydration, and allow the body time to slowly re-regulate blood flow and joint alignment. Share public link
One of the earliest recorded examples of archw bondage can be found in ancient Japan, where it was known as "Hojojutsu." This traditional form of bondage was used by samurai warriors to restrain their enemies, and later evolved into a form of erotic play. The art of Hojojutsu was highly regarded for its complexity and beauty, with practitioners using intricate knots and techniques to create stunning designs.
Achieving an arch typically involves modifying or intensifying classic bondage positions. The most common foundation for this practice is the . In a standard hogtie, the submissive lies face down with wrists and ankles bound together behind the back. To transition this into an arch, the rope or strap connecting the wrists to the ankles is shortened dramatically. As the connecting line is cinched, it forces the legs to bend sharply at the knees and the arms to pull upward, levering the body into a curve.
The origins of archw bondage date back to ancient civilizations, where it was used for various purposes, including spiritual, ritualistic, and practical applications. In some cultures, bondage was used as a form of punishment, while in others, it was a means of expressing artistic creativity, exploring sensuality, or even demonstrating power and control.
is a specific niche within the adult alternative lifestyle community that intersects classic physical restraint, specialized photography, and early digital-era kink subcultures. Emerging from specialized video production sites like Archw during the late 2000s, this term represents a unique approach to bondage that emphasizes strict visual aesthetics, safety protocols, and deep psychological immersion. archw bondage
The world of bondage is vast, ranging from simple bedroom games to the intricate artistry of Shibari. Whether your path leads you to the exquisite arch of a foot or the clinical precision of an archwire, your journey must be guided by knowledge, respect, and an unwavering commitment to consent. Start slowly, communicate openly with your partner, and prioritize safety above all else. By doing so, you transform a physical act into a profound and consensual exploration of trust and vulnerability.
Archwire bonding is a crucial step in orthodontic treatment, as it:
Never leave a restrained individual unattended under any circumstances.
Creating intricate, interwoven patterns that resemble modern architectural designs or complex bridge structures. Safety and Technical Principles The conclusion of a session requires immediate physical
Whether used as a means of artistic expression, sensual exploration, or simply as a way of building trust and intimacy, archw bondage is a practice that can be both fascinating and rewarding. As with any practice that involves restraint or power dynamics, it is essential to approach archw bondage with caution, respect, and a deep understanding of the potential risks and benefits.
: Incorporating structural Japanese rope techniques where the aesthetic placement of natural fibers (jute or hemp) provides both decorative beauty and functional, high-pressure sensory feedback. Safety, Consent, and Risk Management
High tensile strength, smooth surface minimizes friction burns on skin or rigging points. Emergency extraction
Aftercare is the process of helping a participant transition smoothly back into reality after a high-intensity scene. Essential steps include: The art of Hojojutsu was highly regarded for
are standard in Shibari-style Archw for their grip and traditional look, though synthetic ropes are sometimes used for safety and ease of cleaning. Safety Gear
The Psychological Dimension: Understanding the Appeal of Restraint
Some essential precautions to take when practicing archw bondage include:
Players
The first icon represents the player's avatar; if that player is a steam friend of yours they will also have a friend icon attached to their avatar.
Next to the avatar is the player's steam name.
The icon next in line is that player's class icon. Check the scoreboard to see which classes are already being played on your team.
Next to the player's icon is a section for showing when a player has died. This section may also have a tag under it for Developers, Testers, Admins, Contributors and Donators. Server admins can also set sv_communitygroup to the ID of a specific group; that group's title will show up for any players in that group, as long as the title does not conflict with the tags previously mentioned.
The section to the right of here is reserved for Score and Latency, as well as a speaker icon that shows when a player is using their mic. Click on the speaker icon to mute a player's microphone and text chat.
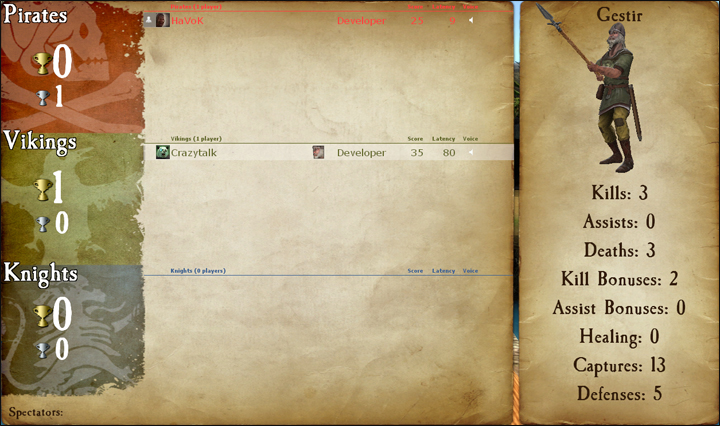
Score Breakdown
- Kills - The number of enemies whom you have killed.
- Assists - Your kill assists. You get an assist any time you were the last to damage a player within a few seconds of a teammate killing them.
- Death - The number of deaths you've suffered. (Good thing it's just a game!)
- Kill Bonuses - You get kill bonuses from things like getting revenge in last team standing, grail kills, etc.
- Assist Bonuses - Just like kill bonuses, but when you get the assist.
- Healing - Points you get from healing your teammates. Not currently used.
- Captures - You gain capture points from completing objectives. This includes capturing a chest, capturing a territory, etc.
- Defenses - The number of times you've defended an objective. This could be returning a stolen chest, defending a territory, etc.
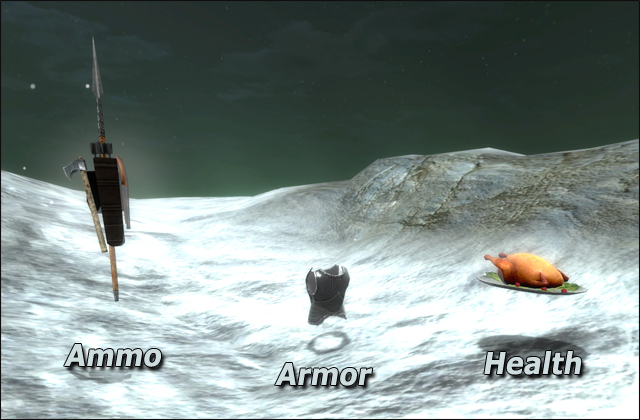
Armor/Ammo