
Yaskawa Error Code H66
State of the art timing analysis
with industry-hardened methods and tools.
State of the art timing analysis
with industry-hardened methods and tools.
...with industry-hardened methods and tools. T1 empowers and enables. T1 is the most frequently deployed timing tool in the automotive industry , being used for many years in hundreds of mass-production projects.
As a worldwide premiere, the ISO 26262 ASIL‑D certified T1-TARGET-SW allows safe instrumentation based timing analysis and timing supervision. In the car. In mass-production.
T1.timing comes with two extension options. Add-on product T1.streaming provides the possibility to stream trace data continuously — over seconds, minutes, hours or even days. Add-on product T1.posix supports POSIX operating systems such as Linux or QNX.
T1.timing comes with a modular concept and several plug-ins which are described in the following. Plug-ins can be easily enabled or disabled at compile-time using dedicated compiler switches such as T1_DISABLE_T1_CONT. To disable T1 altogether, it is sufficient to disable compiler switch T1_ENABLE which leaves the system in a state as of before the T1 integration.
Use the digital operator keypad to navigate to the ( PRG ). Locate parameter H6-06 (Pulse Train Monitor Selection).
Understanding exactly what the H66 code means, why it occurs, and how to methodically troubleshoot it ensures your systems return to peak operational efficiency with minimal delay. What is the Yaskawa H66 Error Code?
Resolving H66 depends heavily on the diagnosis. If the fault is caused by environmental contamination, cleaning the boards may restore functionality. However, simply cleaning is a temporary fix if the source of contamination is not addressed. Implementing proper enclosure sealing, installing filtered fans, or moving the drive to a cleaner location are necessary preventive measures.
The H66 error code is a specific fault code displayed on Yaskawa drives, indicating a problem with the motor or the drive's output stage. This error code typically appears on Yaskawa VFDs, such as the A1, A2, or A3 series.
The causes of H66 generally fall into three categories: environmental factors, component degradation, and catastrophic failure.
When a Yaskawa drive or robot controller displays an unfamiliar code, it can bring a production line to a halt and create uncertainty for even experienced technicians. This guide provides a thorough examination of the Yaskawa H66 error — from the precise parameter conflict that causes it, to detailed troubleshooting steps and proven resolution strategies.
| Terminal Pair | Check These Parameters | |---|---| | Terminals M1‑M2 | H2‑60 (Secondary Function) and H2‑01 (Output Selection) | | Terminals M3‑M4 | H2‑63 (Secondary Function) and H2‑02 (Output Selection) | | Terminals M5‑M6 | H2‑66 (Secondary Function) and H2‑03 (Output Selection) |
What is the of your Yaskawa drive (e.g., GA700, A1000)?
If the error persists after you've carefully reviewed and corrected your parameters, consider these additional steps:
: The first step is to cycle the main power and wait for the DC bus to fully discharge (usually indicated by the "Charge" LED turning off). This can clear transient logic glitches caused by momentary power dips. Inspect Physical Connections
To resolve the H66 error code, follow these step-by-step troubleshooting procedures:
On GA800 series drives, the H66 error is triggered by one of the following :
If the error remains after correcting all conflicting parameter pairs, try the following.
Look for a pair where:
If H6-06 is configured correctly, your scaling factor is likely the root issue.
: If the error persists after resetting and checking connections, the internal control board or the specific option card may have failed. At this stage, professional testing of the Yaskawa Drive circuitry is often necessary. Implications for System Maintenance
Check the "Drive Duty Mode Selection." Mismatched duty cycles (Normal vs. Heavy Duty) can sometimes cause operational errors if the hardware cannot support the setting.
For POSIX-based projects, see T1.posix.
Use the digital operator keypad to navigate to the ( PRG ). Locate parameter H6-06 (Pulse Train Monitor Selection).
Understanding exactly what the H66 code means, why it occurs, and how to methodically troubleshoot it ensures your systems return to peak operational efficiency with minimal delay. What is the Yaskawa H66 Error Code?
Resolving H66 depends heavily on the diagnosis. If the fault is caused by environmental contamination, cleaning the boards may restore functionality. However, simply cleaning is a temporary fix if the source of contamination is not addressed. Implementing proper enclosure sealing, installing filtered fans, or moving the drive to a cleaner location are necessary preventive measures.
The H66 error code is a specific fault code displayed on Yaskawa drives, indicating a problem with the motor or the drive's output stage. This error code typically appears on Yaskawa VFDs, such as the A1, A2, or A3 series.
The causes of H66 generally fall into three categories: environmental factors, component degradation, and catastrophic failure. yaskawa error code h66
When a Yaskawa drive or robot controller displays an unfamiliar code, it can bring a production line to a halt and create uncertainty for even experienced technicians. This guide provides a thorough examination of the Yaskawa H66 error — from the precise parameter conflict that causes it, to detailed troubleshooting steps and proven resolution strategies.
| Terminal Pair | Check These Parameters | |---|---| | Terminals M1‑M2 | H2‑60 (Secondary Function) and H2‑01 (Output Selection) | | Terminals M3‑M4 | H2‑63 (Secondary Function) and H2‑02 (Output Selection) | | Terminals M5‑M6 | H2‑66 (Secondary Function) and H2‑03 (Output Selection) |
What is the of your Yaskawa drive (e.g., GA700, A1000)?
If the error persists after you've carefully reviewed and corrected your parameters, consider these additional steps: Use the digital operator keypad to navigate to the ( PRG )
: The first step is to cycle the main power and wait for the DC bus to fully discharge (usually indicated by the "Charge" LED turning off). This can clear transient logic glitches caused by momentary power dips. Inspect Physical Connections
To resolve the H66 error code, follow these step-by-step troubleshooting procedures:
On GA800 series drives, the H66 error is triggered by one of the following :
If the error remains after correcting all conflicting parameter pairs, try the following. What is the Yaskawa H66 Error Code
Look for a pair where:
If H6-06 is configured correctly, your scaling factor is likely the root issue.
: If the error persists after resetting and checking connections, the internal control board or the specific option card may have failed. At this stage, professional testing of the Yaskawa Drive circuitry is often necessary. Implications for System Maintenance
Check the "Drive Duty Mode Selection." Mismatched duty cycles (Normal vs. Heavy Duty) can sometimes cause operational errors if the hardware cannot support the setting.
| Vendor | Operating System |
|---|---|
| Customer | Any in-house OS** |
| Customer | No OS - scheduling loop plus interrupts** |
| Elektrobit | EB tresos AutoCore OS |
| Elektrobit | EB tresos Safety OS |
| ETAS | RTA-OS |
| GLIWA | gliwOS |
| HighTec | PXROS-HR |
| Hyundai AutoEver | Mobilgene |
| KPIT Cummins | KPIT** |
| Siemens | Capital VSTAR OS |
| Micriμm | μC/OS-II** |
| Vector | MICROSAR-OS |
| Amazon Web Services | FreeRTOS** |
| WITTENSTEIN high integrity systems | SafeRTOS** |
| Qorix | Qorix Classic |
| Embedded Office | Flexible Safety RTOS |
(**) T1 OS adaptation package T1-ADAPT-OS required.
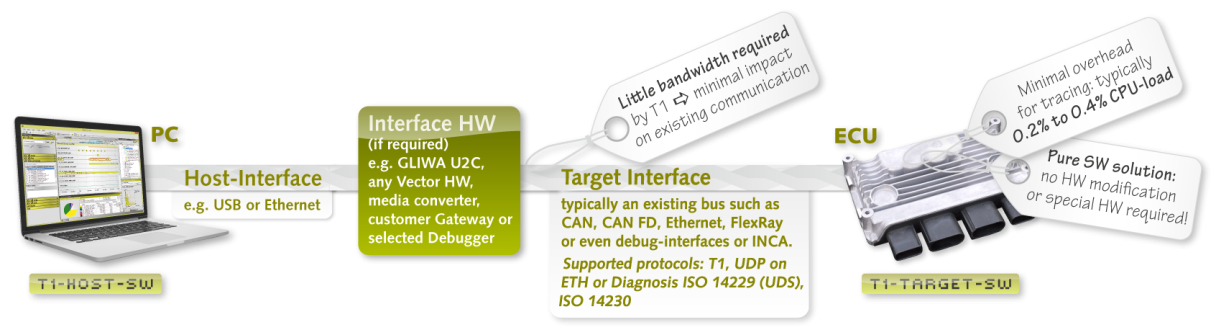
| Target Interface | Comment |
|---|---|
| CAN | Low bandwidth requirement: typically one CAN message every 1 to 10ms. The bandwidth consumed by T1 is scalable and strictly deterministic. |
| CAN FD | Low bandwidth requirement: typically one CAN message every 1 to 10ms. The bandwidth consumed by T1 is scalable and strictly deterministic. |
| Diagnostic Interface | The diagnostic interface supports ISO14229 (UDS) as well as ISO14230, both via CAN with transportation protocol ISO15765-2 (addressing modes 'normal' and 'extended'). The T1-HOST-SW connects to the Diagnostic Interface using CAN. |
| Ethernet (IP:TCP, UDP) | TCP and UDP can be used, IP-address and port can be configured. |
| FlexRay | FlexRay is supported via the diagnostic interface and a CAN bridge. |
| Serial Line | Serial communication (e.g. RS232) is often used if no other communication interfaces are present. On the PC side, an USB-to-serial adapter is necessary. |
| JTAG/DAP | Interfaces exist to well-known debug environments such as Lauterbach TRACE32, iSYSTEM winIDEA and PLS UDE. The T1 JTAG interface requires an external debugger to be connected and, for data transfer, the target is halted. TriCore processors use DAP instead of JTAG. |
